
I just got back from a vacation where I took photos with both my
point-and-shoot camera (Canon A540) and my Android phone (Moto X). The camera
uses the filename format IMG_????.JPG while the phone uses the format
IMG_YYYYMMDD_HHMMSS.jpg. This means that the two sets of photos cannot be
easily viewed as one coherent set. To fix this problem, I used exiftool to
bulk rename the camera files to IMG_YYYYMMDD_HHMMSS_????.jpg.
$ sudo aptitude install exiftools
First, I had to fix the timestamp on the camera photos since I forgot to change the timezone on the camera. EXIF timestamps are recorded in local time with no timezone information, so I had to correct the timestamps by adding, in this case, 13 hours.
$ exiftool '-DateTimeOriginal+=0:0:0 13:0:0' ???_????.???
Then, I renamed the files in my desired format, inserting the timestamps
between the IMG\_ prefix and the ????.JPG suffix. I also converted the
suffix to lowercase to be consistent with the Android photos.
$ exiftool '-filename<${FileName;s/_.*//}_${DateTimeOriginal}_${FileName;s/.*_//;tr/A-Z/a-z/}' -d '%Y%m%d_%H%M%S' ???_????.???
Finally, I had to manually adjust the .avi filenames since exiftool cannot write EXIF data for AVI files, and thus cannot adjust the timestamps in the first command. I did this with a simple copy and paste from the corresponding .thm files.
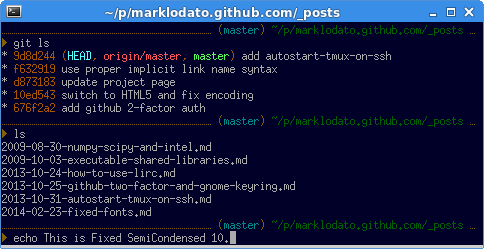
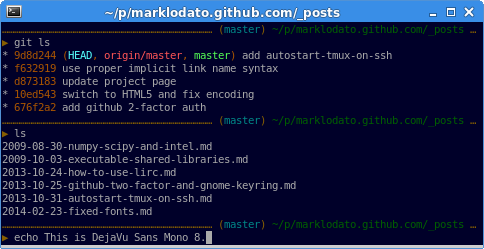
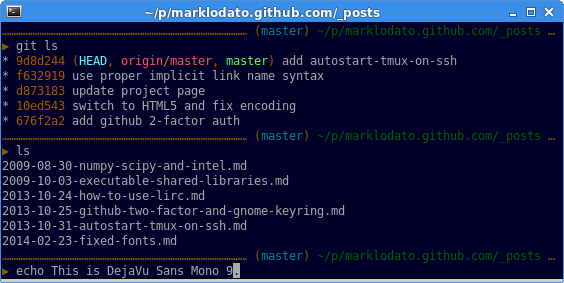
I really love the “fixed” bitmap font family on Linux. It is readable at a much smaller size than any TrueType font I have found. Compare:
To enable this font in Xterm, add the following to your ~/.Xresources:
XTerm*font:             -*-fixed-medium-r-*-*-13-*-*-*-*-60-iso10646-1
XTerm*boldFont:         -*-fixed-medium-r-*-*-13-*-*-*-*-60-iso10646-1
On Ubuntu, all bitmapped fonts are disabled by default in fontconfig, so it is not possible to use this font in, say, gnome-terminal or xfce4-terminal. To enable this font, you must do the following, courtesy of cpitchford on Ubuntu Forums:
$ sudo su
$ cat > /etc/fonts/conf.avail/69-fixed-bitmaps.conf <<EOF
<?xml version="1.0"?>
<!DOCTYPE fontconfig SYSTEM "fonts.dtd">
<fontconfig>
  <!-- Enabled Fixed bitmap fonts -->
  <selectfont>
    <acceptfont>
      <pattern>
        <patelt name="family">
          <string>Fixed</string>
        </patelt>
      </pattern>
    </acceptfont>
  </selectfont>
</fontconfig>
EOF
$ ln -s ../conf.avail/69-fixed-bitmaps.conf /etc/fonts/conf.d/
$ dpkg-reconfigure fontconfig-config
$ dpkg-reconfigure fontconfig
And then restart X. Presto!
It’s always a good idea to use screen or tmux when doing any
significant amount of over SSH in case your connection gets dropped. If you
do this frequently, you might want to have screen or tmux start
automatically so you don’t forget. To do this, append the following to your
ssh command, or if you’re using Chrome’s Secure Shell extension, add
the following to the “SSH Arguments” field:
-t -- screen -R
or:
-t -- /bin/sh -c 'tmux has-session && exec tmux attach || exec tmux'
Explanation:
-t tells SSH to always allocate a pseudo-TTY. Without this, you’ll get a
not a terminal error.
-- tells SSH that what follows is a command. Without this, you’ll get a
cryptic ssh_exchange_identification: Connection closed by remote host
error, at least with Secure Shell.
screen -R attaches to an existing session or creates a new one if none
exist.
tmux doesn’t have an equivalent to screen’s -R option, so we need to do
this manually. The command is mostly self-explanatory, except:
/bin/sh -c allows us to use && and || in our command.
exec replaces the /bin/sh process with tmux so that we don’t have an
extra process hanging around. If you don’t care about this, a simple
'tmux attach || tmux' will do.
I recently enabled two-factor authentication on GitHub and then ran into issues when trying to push with a password. I usually push via SSH, which is unaffected by 2FA, but on some machines I don’t bother with that and just type my password in the rare circumstance that I push from that machine. Sadly, there is no easy way to use 2FA with this method, so you have to jump through a few hoops.
First, you need to set up a GitHub Personal Access Token. This is a long,
random password that avoids the need for a second factor at login. (Google
calls this an “Application Specific Password.”) If you use a Personal Access
Token instead of your regular password when prompted by git push, everything
works fine.
However, this creates a second problem: how do you remember that password? My solution was to use Gnome Keyring, which recent versions of git support. It does not come pre-compiled, so you have to compile and install it yourself (thanks to James Ward for these instructions):
$ sudo apt-get install libgnome-keyring-dev
$ cd /usr/share/doc/git/contrib/credential/gnome-keyring
$ sudo make
$ sudo rm git-credential-gnome-keyring.o
$ sudo mv git-credential-gnome-keyring /usr/bin
$ git config --global credential.helper gnome-keyring
Now, so long as you include your username in the URL, git will save your password in Gnome Keyring. (If you don’t put your username in the URL, git doesn’t seem to save the password.) For example:
$ git clone https://MarkLodato@github.com/MarkLodato/scripts
There is one final caveat. If you are connected to your workstation via SSH,
you’ll need to set up D-Bus, or else you’ll get Error communicating with
gnome-keyring-daemon. The solution is to add the following to your
.bashrc or .zshrc file:
if [[ -z $DBUS_SESSION_BUS_ADDRESS ]]; then
    if [[ -f ~/.dbus/session-bus/$(dbus-uuidgen --get)-0 ]]; then
        source ~/.dbus/session-bus/$(dbus-uuidgen --get)-0
        export DBUS_SESSION_BUS_ADDRESS
    fi
fi
This tells D-Bus to use the instance that was started on the machine’s
graphical login, and this in turn allows git-credential-gnome-keyring to
talk to the main gnome-keyring-daemon instance. In my case, I have always
unlocked the keyring graphically when I was sitting at the machine, so I have
not yet run into the issue where I have to unlock the keyring from the command
line.
Summary:
Create a Personal Access Token on GitHub and use this as your password.
Compile git-credential-gnome-keyring from
/usr/share/doc/git/contrib/credential/ and add it to your
credential.helper git config.
Remember to include username@ in the push URL, or else git won’t save
your password.
If you are SSH’d to your workstation, set up $DBUS_SESSION_BUS_ADDRESS.
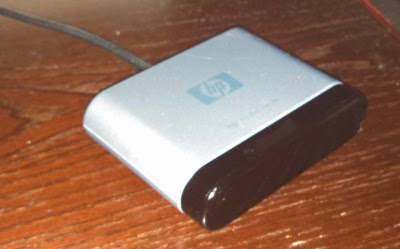
I listen to Pandora all the time at home, and I often want to control it without using the keyboard or mouse. So, a few years ago I bought a USB infrared receiver for $14. Of course, since I use Linux, the hidden cost was hours and hours of time figuring out how to set it up. I never wrote anything down back then, but since I had to relearn it all last weekend to make a few changes, now is a good time to document it.
This article is written for Ubuntu 13.04, so some things might be different for other operating systems. It also assumes you want to use an infrared remote; you could also use a bluetooth remote or some cellphone app, but I don’t know anything about those.
irrecord and follow the instructions to generate a remote definition
file./etc/lirc/ to use the new remote definition file.irw./etc/lirc/lircrc, or (b) configure ~/.lircrc and
set up irexec to start at session startup.First, you need an IR receiver. The safest bet is to buy a “USB Media Center IR receiver,” aka an “MCE receiver.” I got the following one for $14, including shipping:
Note that IrDA ports found in older laptops won’t work for this purpose.
Second, you need an IR remote. You could use an existing remote if you know it won’t cause a conflict—say, you no longer use the TV it goes with, or the TV and the computer are in different rooms. Or, you could buy a new remote just for the computer. But the most likely option is that you have an existing remote that has a “universal” feature. In that case, all you need to do is configure the universal feature to use some non-existent device. For example, if your TV remote can control a DVD player, and you don’t have DVD player, configure the remote to control any DVD player listed in the remote’s manual. It doesn’t matter which one—LIRC can (probably) handle any.
If you have a Windows Media Center (MCE) remote (as opposed to, say, a TV or DVD remote), or if you have set up your universal remote to send MCE codes, then X will automatically interpret some buttons as keyboard keys. If this is all you want, then you’re done!
Unfortunately, most people will want more than this, in which case the built-in keyboard emulation will just get in the way. So, you need to disable it. If you forget to do so, X will send the keyboard keys in addition to whatever you configure LIRC to do, and it will appear that you’re getting double key presses.
First, you need to determine the product name for your IR receiver. To do
this, make sure your IR receiver is plugged in and look through
/proc/bus/input/devices to find the name of your device. Here’s the output
on my computer:
$ grep '^N:' /proc/bus/input/devices
N: Name="Power Button"
N: Name="Power Button"
N: Name="Microsoft Comfort Curve Keyboard 2000"
N: Name="Microsoft Comfort Curve Keyboard 2000"
N: Name="Logitech Unifying Device. Wireless PID:101b"
N: Name="Media Center Ed. eHome Infrared Remote Transceiver (1934:5168)"
N: Name="MCE IR Keyboard/Mouse (mceusb)"
Find the one that sounds like “Media Center … Remote Transceiver.” Then,
create the file /usr/share/X11/xorg.conf.d/10-mce-keyboard-disable.conf with
the following contents, replacing the value of MatchProduct with whatever
name you found above. (In the old days, we would have added this to
/etc/X11/xorg.conf, but now evidently we create these xorg.conf.d files.)
# Disable the MCE remote from acting like a keyboard.  (We use lirc instead.)
Section "InputClass"
    Identifier   "MCE USB Keyboard mimic blacklist"
    Driver       "mceusb"
    MatchProduct "Media Center Ed. eHome Infrared Remote Transceiver (1934:5168)"
    Option       "Ignore" "on"
EndSection
LIRC is the program that interprets IR signals. To install it, run:
$ sudo apt-get install lirc lirc-x
LIRC works in two steps: the lircd program that translates remote signals to
generic “buttons,” and then client programs—notably irexec—translate
buttons to actions.
So, three are things you need to do:
lircd to use the proper definition file.irexec.If you’re using a non-MCE receiver, you may also have to spend some time configuring LIRC to use your receiver, but thankfully MCE receivers work out of the box.
Unless there already happens to be a file in /usr/share/lirc/remotes/ that
works with your remote, you are going to have to train LIRC to understand all
the buttons on your remote. (If there is one already, skip to the next
section.)
Make sure that lircd is not already running, and then use the irrecord
program to create what I am calling a remote definition file. Obviously,
replace WHATEVER_YOU_WANT with, well, whatever you want to call your remote.
$ sudo service lirc stop
$ sudo irrecord --device=/dev/lirc0 /etc/lirc/lircd.WHATEVER_YOU_WANT.conf
Follow the on-screen instructions, and when it when it asks you to “Please enter the name for the next button,” open up a new terminal window and run
$ irrecord --list | less
to find an appropriate name for the button you want to learn. I recommend only programming four or five buttons for now, and then moving on to the next section. I ended up having to delete my config and start over several times, so it’s not worth investing too much time now.
Once you have tested your config with irw in the next section and are
confident it is working, you can run the same irrecord command again to add
more buttons. As long as you point it to the same config file, you won’t have
to go through the training step again.
Now we have to tell lircd to use the new definition file. We do this in two
places:
First, in /etc/lirc/lircd.conf, include your remote definition file. This
will be the only command in the file.
include "/etc/lirc/lircd.WHATEVER_YOU_WANT.conf"
Second, in /etc/lirc/hardware.conf, set REMOTE_LIRCD_CONF to the remote
definition file. (I don’t think this does anything, but it doesn’t hurt.)
REMOTE_LIRCD_CONF="/etc/lirc/lircd.WHATEVER_YOU_WANT.conf"
Now, start lircd and test it with irw. Press a few of the buttons you
have trained in the previous section and make sure they show up in irw. For
example:
$ sudo service lirc start
$ irw
000000037ff07bed 00 KEY_CHANNELUP mce_custom
000000037ff07bec 00 KEY_CHANNELDOWN mce_custom
If you get one line per press (plus repeated lines if you hold down the button), it works! Feel free to go back to the previous section and configure more buttons.
The last step is to configure irexec, which is the thing that actually does
something useful when you press a button. You have two choices here:
A. Create /etc/lirc/lircrc and have irexec run as root. This has the
advantage of starting and stopping irexec automatically whenever you
start/stop lircd.
B. Create ~/.lircrc and have irexec runs as your user. If you do this,
you need to configure your desktop environment to automatically start
irexec at the beginning of each session. You will also need to restart
irexec every time lircd restarts.
Create one of the two files listed above. The documentation is pretty good, but here is my config file for reference:
begin
    button = KEY_VOLUMEUP
    prog = irexec
    config = /usr/bin/pactl -- set-sink-volume 0 +2%  # vol+
    repeat = 1
end

begin
    button = KEY_VOLUMEDOWN
    prog = irexec
    config = /usr/bin/pactl -- set-sink-volume 0 -2%  # vol-
    repeat = 1
end

begin
    button = KEY_PLAY
    prog = irexec
    config = /home/mark/local/bin/pithos-control play
end

begin
    button = KEY_PAUSE
    prog = irexec
    config = /home/mark/local/bin/pithos-control pause
end

begin
    button = KEY_STOP
    prog = irexec
    config = /home/mark/local/bin/pithos-control pause
end

begin
    button = KEY_FASTFORWARD
    prog = irexec
    config = /home/mark/local/bin/pithos-control skip
end

begin
    button = KEY_SLEEP
    prog = irexec
    config = /usr/bin/xset dpms force off  # blank monitor
end
The file is pretty self-explanatory. Each button is something I defined in
my remote definition file. The pactl program works with PulseAudio, which
is the default audio system on Ubuntu. The pithos-control program is
described in the next section. And the xset line turns off my monitor,
which I often want to do if I’m listening to music.
When you’re done, remember to either sudo service lirc restart if you are
using /etc/lirc/lircrc or irexec -d if you are using ~/.lircrc.
Otherwise, nothing will happen when you press a button.
I always use Pithos to play Pandora. Not only is it way lighter than the bloated web-based one, it is also controllable via D-Bus. Sending D-Bus commands manually is a bit ugly, so I made a little wrapped called pithos-control. The main advantage is that it adds discrete play and pause commands, which Pithos lacks.
When I was trying to set up my remote, I found plenty of suggestions on the
Internet to use something called ir-keytable instead of, or in conjunction
with, LIRC. I did use it for a while, but in the end I found that using
straight LIRC was way better.
The main problem was that ir-keytable (by itself) creates virtual keyboard
presses for each button press. If you want to control, say, the volume, you
would configure the “Vol-“ button to send the XF86AudioLowerVolume key. This
sounds fine, but the issue is that, at least in XFCE, the media keys cause the
foreground window to lose focus each time they are pressed. So, if I were
typing something and my wife hit the volume button, a few of my keystrokes
would be lost, which was really irritating. It was even worse when I was
playing a game.
I put up with the above for a long time, but the final straw was when I tried
to get the xset dpms force off command to work. It was impossible with
ir-keytable because the virtual keyboard button that I had to map the
command to would immediately wake the monitor up. This ended up being a
blessing in disguise, since it made me realize that I could ditch
ir-keytable for LIRC.
I also found that ir-keytable was less reliable than LIRC. I have no hard
evidence of this and I am not inclined to set it up again, but that was my
impression.
My setup stopped working after upgrading to Ubuntu 17.04. It appears this is
a very common problem. When I ran irw it showed nothing, and when I ran
mode2 I got:
$ mode2 -d /dev/lirc0
Using driver devinput on device /dev/lirc0
Trying device: /dev/lirc0
Using device: /dev/lirc0
Running as regular user mark
Partial read 16 bytes on /dev/lirc0
This first step is to change the driver to default in
/etc/lirc/lirc_options.conf:
driver = default # was devinput
At this point, it seemed like it was working, but in actuality there was
a root irexec running in addition to my session irexec. And this root
irexec would crash the machine when I pressed fast forward! Turning it off
fixed the problem.
$ sudo systemctl stop irexec.service
$ sudo systemctl disable irexec.service